Twitter can be a force for good if handled in the correct way. In this post, I’ll share my take on how to optimize Twitter ads for business by ensuring your targeting is taking the right path.
In the example below, we are using a “website clicks and conversions.” We’ll be addressing three areas of the campaign.
- Ensuring your campaigns are targeting the right audiences
- Creating impactful ads to increase engagement
- Budgeting effectively
I wanted to start by giving a quick overview of the default homepage of your account.
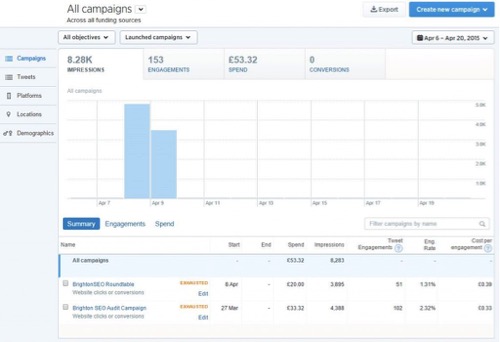
There are a couple of dummy campaigns in the account above to provide some data to analyze. Here is what’s included:
- A graph shows all of the ‘vital’ statistics for your account; amending the date range (top right) will provide a more granular hourly breakdown if looking at day rather than week for example
- In the table, Impressions identifies the number of times your ad has shown
- In the same location, you’ll see Tweet Engagements which is the number of times people have engaged with your ads
- The spend is how much that has been spent in the date range selected
- Conversions show the impact of sales, or actions taken on the website for example
Conversion tracking is very easy to install – visit the Tools > Conversions Tracking page where you create the code which you will then need to paste on your website.

All of the data shown in the overview screen shows every campaign that either is or has been running. To look at metrics or specific campaigns, simply scroll down and select the campaign that you would like to review.
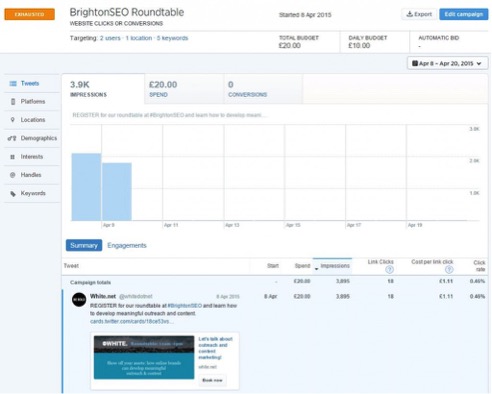
In the overview screen you can quickly compare metrics between campaigns, closely review the impressions to ensure your ad is reaching enough people, and view Tweet Engagements to see how many times your ad has been interacted with. In terms of Engagement Rate, aim for anything higher than 1.00% as a benchmark (if lower, consider revising your targeting or ad creative). Here, you’ll also see Cost Per Engagement, which highlights the average cost per engagement or click.
Clicking into any of your campaigns will provide you with a snapshot which looks similar to the campaign overview screen. You can view the breakdown of impressions, spend etc, but it also provides visuals of the ads that are running within that campaign. This is extremely handy as you can easily identify which ad creative is performing better given that the targeting is the same for both ads. It also reports on many other metrics such as Platform, Location, Interests, and more on the left hand side broken down by the targeting features within Twitter (discussed later in this post).
So, to begin editing a campaign click the blue ‘Edit campaign’ button in the top right corner of the campaign screen. By default, you will be presented with options to change your campaign name etc, but we will scroll down past this to the Creative section. You will then see a screen like this:
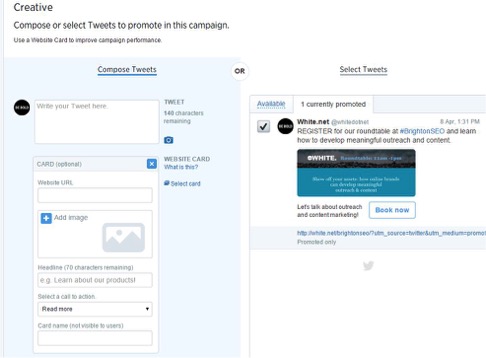
As this is a clicks and conversion campaign, it is recommended that you set up a website card, as shown in the image above, rather than just promoting a tweet as this gives visual impact.
If I right click on the date on the creative shown and ‘Open in new tab’ it gives us a larger view of the website card and shows how it will look live.
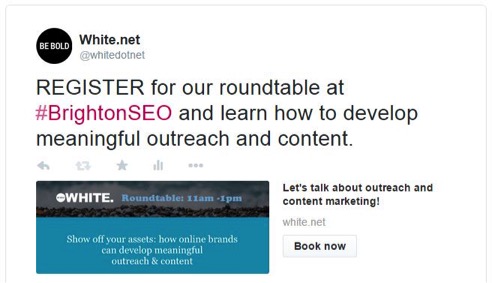
The headline clearly shows the desired action. A positive from this is that there are no other links referenced on this card which keeps the user engaged with our message. When you create a tweet with a desired call to action (CTA), I recommend that it is formed of three parts: a question, solution and CTA.
The image is strong and powerful, branded, and informative.
The CTA, ‘Book Now’ is ideal for this card. There are a couple of options available for this button such as ‘Learn more’, ‘Shop now’… but for this ad the ‘Book now’ is representative of the desired action we would like users to take. If you were selling running trainers then you would select ‘Shop now’ for example.
I recommend that you promote 2-3 different tweets for any given campaign at any time. Experiment with different headlines, images and CTA buttons. From the campaign snapshot screen, you will be able to clearly identify which ads are performing best. From this screen you can then test further by breaking down that ad and create variants of the headlines, CTA button, image etc. Continuously TEST, TEST, TEST.
Experience tells us that currency and percentage symbols work well… ‘fifty percent off’ or ‘50% Off!’ – which looks more attractive to you?
OK, so moving on down the screen…
Targeting
The first option is location. By default you may select country, but for the UK you can go down to postcode level. This is great if you have in-store offers because you can select to show your ads within a certain radius of your stores.
Next is gender. If you are targeting ladies running shoes then select female here… you get the idea.
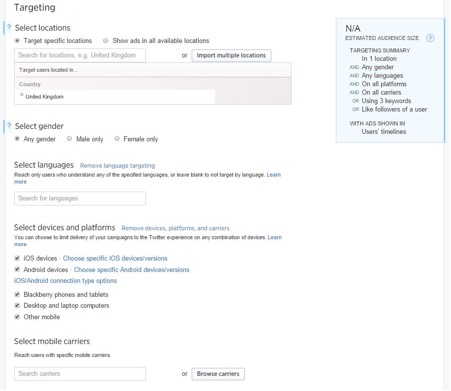
Languages
…this is a fairly obvious one I think.
Devices And Platforms
Now, it is important to note that if you have a mobile friendly or mobile site (m.XXXXX.com) then I would recommend that you allow the ad to run on mobile devices. If your site is not mobile-friendly, then I would recommend keeping just on desktop. There is nothing more frustrating to a potential customer than hitting a non-mobile optimized site when you are asking them to purchase. The navigation and sales funnel needs to flow easily for your users.
You may want to also consider separating out mobile and desktop campaigns. This will allow you to adapt the messaging within your ad to be more relative for mobile… ‘50% Off Ladies Running Trainers – Shop Now from Your Mobile.’
There is a great feature which allows you to select which mobile carriers to target. So, if you have an O2 Priority offer you may want to select to target O2 only as the carrier option.
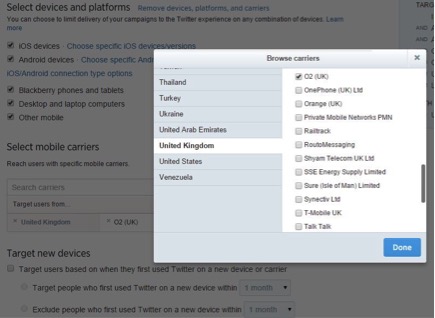
You can also look to target new devices, or users based on when they first used Twitter on the selected devices/carriers.
Additional Target Criteria
Keywords: First, lets review all of the keywords. Ensure that you are utilizing your budget on keywords that are performing well, by conversions for example. To review the performance of your keywords, open up a new tab and navigate to the campaign snapshot screen (with the additional targeting features on the left hand side) and select the campaign, then “Keywords” on the left. You should then see a screen similar to this:
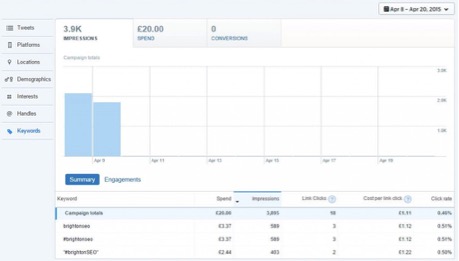
From this screen we can see how well (or badly) each keyword for the campaign is performing. We can measure the performance here clearly by Link Clicks as our desired action is Clicks to website. From the above image it shows that each keyword is performing similarly and well. NB: Adjust the date range for the desired period. However, if I was forced due to budget constraints, to optimize budget allocation I would look to remove the keyword ‘#brightonSEO’ as it has the lowest impression count, link clicks and the highest cost per link click. To do this we would go back to our campaign tab, click on the keyword and then “Remove keyword.”
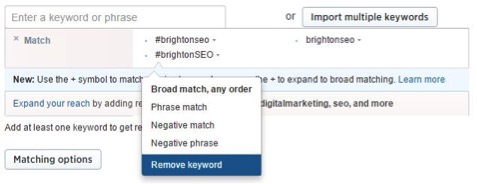
What we could do with this campaign is add additional keywords to increase the campaign’s reach. It is recommended to target no less than 10 and no more than 100 keywords per campaign (this may vary if you have a specific product for sale). Click on “Expand your reach” which will launch a pop-up with a list of recommended keywords for this campaign based on what you have already. Simply tick the keywords you would like to add and click “Add keywords.” Allow the new keywords to run for at least a couple of days and then run a review of their performance. Think about adding in keywords from other search campaigns that you have identified are working well in Google AdWords or Bing Ads campaigns.
Add followers: You may want to add followers to increase reach. If you have not added any to the current campaign then click the ‘Add @usernames like……’ link which will provide a list of recommend handles based on your current handle targeting. For example, if you are advertising ladies running trainers you may want to add handles such as @schuh. If you already have handles added then similarly to the keyword review you can review the performance of handles by clicking on ‘@ Handles’ on the left-hand side. Look to update the applicable handles as required.
In our example, we have added @brightonseo, which when clicking on Add @usernames provides these recommendations…:
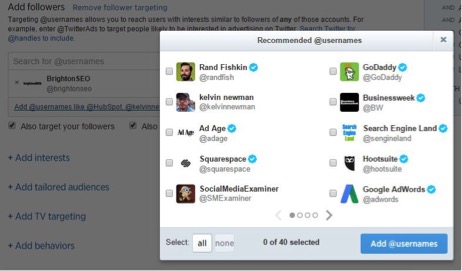
…which we can see are quite relevant to our current handle targeting. Again target between 10 – 100 handles if possible. Don’t forget to also refine and replace your keywords and handles lists.
Interests: These two options allow us to refine our reach based on users’ interests. In our example we could add ‘SEO’ as an interest.
And finally, Budget: All of the above will ensure that you have targeted your campaign tightly and so the budget will be used against relevant impressions/engagement etc. You have options here, Daily and Total budgets. I think these are both pretty self-explanatory but ensure that your daily budget is not going to use up your total budget within one day (unless you have a limited promo). I have seen before where clients have accidentally added £200 as the daily and £20 as the total… thinking that the options were the other way around. So to run a campaign for one week with a total budget of £300.00, set the daily budget to £42.85.
If you click the ‘Show advanced options’ link it will allow you to choose a pricing option. You then have two options here, allow Twitter to automatically bid for you to optimise the bids on your behalf or to set a manual maximum bid. I would recommend allowing Twitter to auto-bid for you, certainly to start with, as we have tightly targeted the campaign based on all of the above. Below this further is Pacing, similar to AdWords you have the option of Standard – to spread the budget throughout the day where possible or Accelerated – which ensures your budget is utilised as quickly as possible, ideal for promo campaigns. With accelerated I would consider using a manual max bid option here to control costs.
To Recap:
- Ensure that your campaigns have a large enough audience, review keywords and handles often
- Keep your targeting tightly knit
- Review and refine your targeting often to ensure that your ads are also relevant
- Use compelling ad creatives with clear CTAs and benefits
- Keep clicks to the website only, avoid adding in other links
- Start your bidding set to auto, this saves a lot of time manually reviewing
- Ensure that your budget and spend levels are adequate for the campaign
I hope the above helps you optimise your campaigns and I welcome your feedback in the comments section below, or feel free to reach out to me on Twitter.
Happy tweeting!


