Excel and Google sheets are every PPC account manager’s best friend. As a newbie, getting familiar with these tools and knowing their applications for everyday PPC is super important. In order to help you along, I’ve outlined some helpful tips and how to apply them to your PPC account management. Essentially, I’m helping you *excel* at your job. You’re welcome!
Disclaimer: I have a personal preference for Google sheets, so you’ll notice that’s where the screenshots in this post come from. All of these tips are still applicable for excel lovers!
Concat & Concatenate: The Greatest Function of All Time
Okay, if you don’t know about concat and concatenate, then I am about to blow. your. mind. Concatenate lets you combine a number of different strings of text, while it’s little sister, concat, let’s you combine two strings of text.
Concatenate has a plethora of applications in the PPC word. For one, using concatenate to combine different elements of ad copy is super helpful! For example, you can insert locations into your ad copy to make your ads seem more relevant to the user. (A more advanced way to do this is with geographic customizers, but this post is for newbies!).
Here’s how:
Warning: This technique requires good campaign naming conventions, which you can learn more about here.
1. Create an excel or sheets doc with the campaign names and ad groups you’d like to create ads for. Duplicate your campaign name column and add three or more columns directly to the right of it.
2. Assuming your campaigns include location in their naming conventions, use the “split text to columns” tool under the data tab to split the rest of the campaign name from its location*. (Keep in mind that the split text tool will make a column for each grouping of data. Don’t forget to add extra columns or you’ll lose the data in your columns to the right).
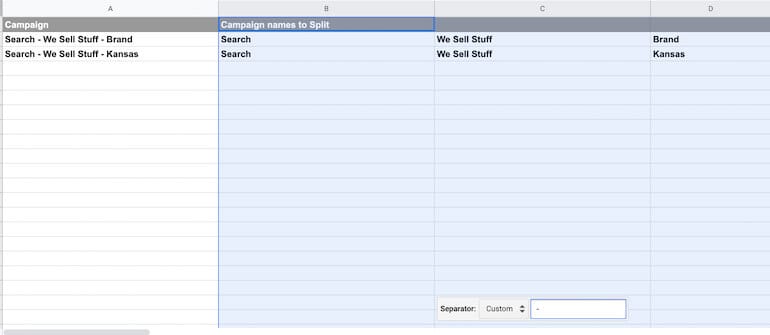
3. Delete the columns with extra campaign name data that you don’t need and relabel the column with your locations.
4. You’ll notice in this example that there’s a brand campaign, so we end up with “brand” in the location column. You can use find & replace to exchange “brand” for something like “near you”. Create a filter and filter out any branded campaigns for now, since the ad copy phrasing will be slightly different between your brand and location-specific campaigns.
5. Now use the concatenate function to create your ad copy. You can either type in the text you’d like combined with your location text or you can reference other cells.
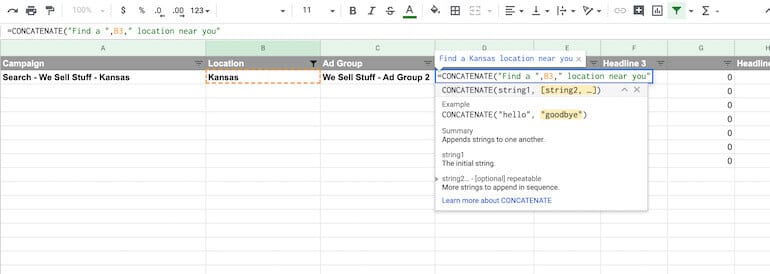
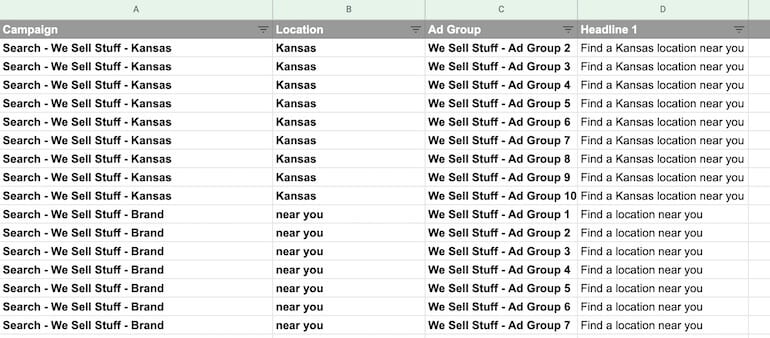
6. Repeat the last step with your branded campaigns, and there you have it! Fresh, new, ad copy that speaks directly to the user! Concatenate is especially great when you have a lot of data to work with.
Your finished product will look something like this:
*Pro Tip: If your campaigns don’t include the location in their naming convention, you can export the campaign settings along with the location column, and use a vlookup to match campaign, ad group, and location data.
Bonus Pro Tip: You can also use the concat function to combine campaign and ad group names to create a unique key for vlookups!
Creating Broad Match Modified Keywords
Broad match modified (BMM) keywords are wonderfully useful in your account, but if you need to bulk upload many at a time, it can be a pain to manually add those plus signs. Here’s a quick and easy way to add the modifiers to your broad match keywords:
1. Find and replace the spaces between any keywords/phrases with a space and a plus sign.
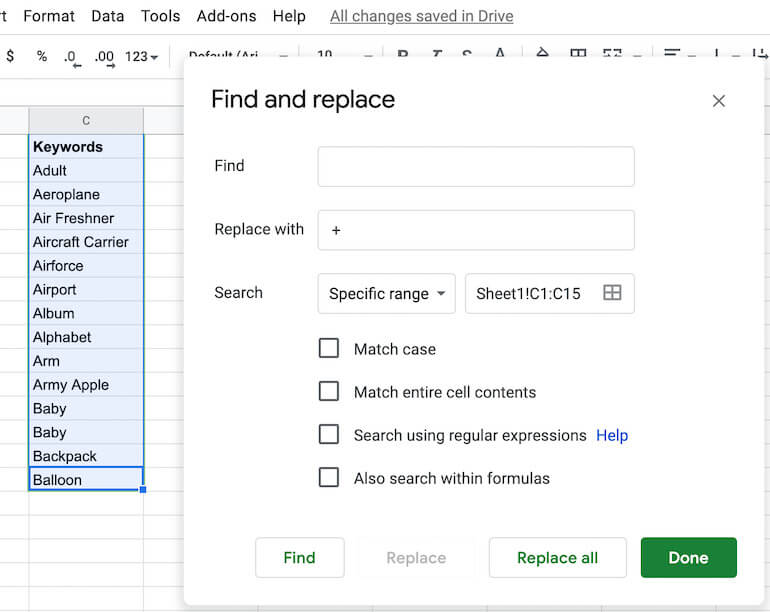
2. Use the “concat” or “concatenate” function to insert “+” at the beginning of each word.
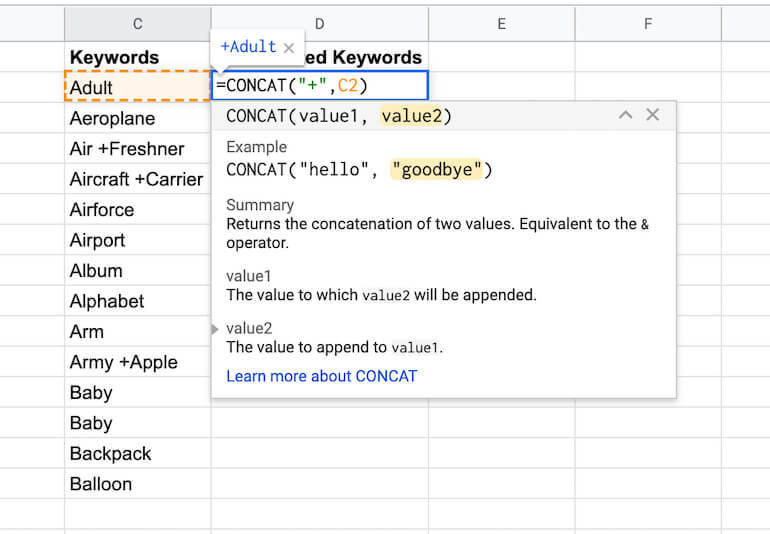
You’ll still need to include a column in your upload sheet with match type, but this strategy should make creating BMM keywords a breeze!
Pro Tip: Sometimes if you’re making edits to existing BMM keywords, sheets and excel will mistake those keywords for a formula. You can concat an apostrophe to the beginning of these keywords to force excel/sheets to recognize the keyword as text.
Get Sorted with Sort Range
Filters and pivot tables are great for organizing data, but their unfortunate limitation is that you can only sort by one metric at a time. Using the tool “Sort Range” allows you to sort by multiple metrics in order of importance, and becomes incredibly useful in tasks like trying to determining the best ad copy. While metrics like click-through rate (clicks divided by impressions) are useful on their own, sometimes they don’t give you the full picture of what’s going on. An ad could have a 100% click-through rate, which sounds great on the surface, but less great when you find out it only had 5 clicks and 5 impressions. Here’s how to use “Sort Range” to get the most out of your data:
1. Highlight the range you’d like to sort and choose the data tab and then the sort range option.

2. Once you choose sort range, it will give you a number of columns to sort your data by. Check the “data has header row” box so you know what metrics you’re sorting by. Order the metrics that are most important to you.
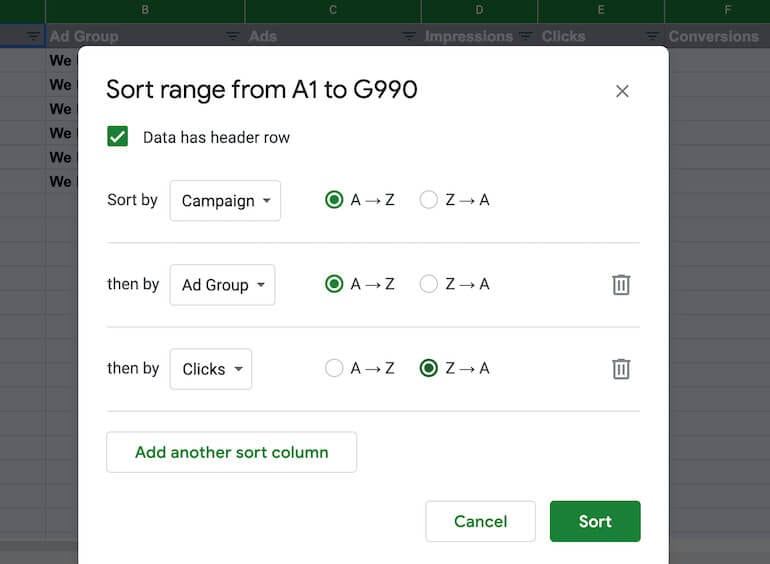
3. If you want to see the best performing ad overall, you might only sort by metrics like conversions, click-through rate (CTR) and impressions. (Hint: Z to A for numbers means most to least). You can also determine which ads are the best performers in each ad group. Sort by campaign and ad group from A to Z, and then the rest of the metrics from Z to A. The best performing ads will appear at the top of each ad group in the sorted range.

In this example, it looks like Ad Variation 1 was the best performing ad in each ad group.
If this post has made you super excited about all the sheets and excel possibilities, learn to master excel with The Essential Toolkit for PPC Marketers. Happy PPCing!

Hero Conf’s Excel Workshop is aimed to help you better understand the Excel functions and features that can help you to optimize your analysis and reporting so you can spend more of your time on high-level, strategic work.


