Welcome to the second installment of our PPC Love Series this month. Even though today is my birthday, which is a very happy day, I am prepared to tell you about my heartache and strife with the adCenter editor and it’s sometime unwillingness to be a good PPC partner. So what do you do? Keep it around or break up with it? Many times I have wanted to end the relationship, but I stuck it out. And you will too after reading this amazing editor tip on how to upload your negatives in bulk. Really. You will love this more than Elvis loved grilled peanut butter and banana sandwiches.
In the past 6 months, my relationship status with adCenter and the desktop editor has changed from “It’s Complicated” to “Engaged.” I have become proficient with these PPC tools and if I don’t know where something is, I poke around until I find it. But this stumped me for sure: How in the world can I save time and upload a bulk list of negatives? I don’t have to insert each keyword into their ad groups individually, do I? If that is the case, this relationship is over. Don’t get me wrong, I am all for working on solving a problem, but I would never get to anything else in my accounts! So, I asked for help. Yup, the adCenter editor and I went to counseling and here is what I learned.
Step One: Gathering Your Information
In order to create a negatives keyword list, you need to perform a Search Query Performance report. If you have not pulled this report in a while, I suggest taking a 3-month snapshot. This will be a lot of data to sort through, but it’s all valuable information! Sort your excel spreadsheet in ascending order by the search term and start scrolling. The first move is to find search inquiries that are completely bizarre and have nothing to do with your account and mark those as negatives. It could be a word, a phrase, or you may want to eliminate the entire search as an exact match. Next, sort by conversions. This is a great way to actually expand your account by adding in these higher converting words or phrases. On the flip side, you can exclude things that have not converted or have a very low click-through rate. Once your exclusions are made, create your new upload sheet.
Step Two: Prepping Your Information
Creating your bulk upload sheet is simple. Create your columns and fill in your information. The following columns are required for upload:
- Type:
- The column will be filled with either “Campaign Negative Keyword” or “Ad Group Negative Keyword.” This will depend on where you want your negative to be placed.
- Will it be on the Campaign or Ad Group level? Remember, Ad Group level negatives will trump Campaign level negatives.
- Campaign:
- The column will be filled with the different Campaign names and is needed for Campaign AND Ad Group level negatives.
- Ad Group:
- This column will only be needed if “Ad Group Negative Keyword” is the Type.
- Status:
- This column should say “Active.”
- Negative:
- This column will be filled with the negative keyword you want to upload.
- Remember that adCenter will not recognize a match type column for negative keywords. So where you would actually delete out the match type signifier out of your Google keyword column, for adCenter, you will need to add them in!
- Phrase Negatives should be signified with “quotes”
- Exact Negatives should be signified with [brackets].
- Broad Negatives – tricked you! There is no such thing in adCenter… don’t forget that!
Step Three: Uploading Your Information
In the editor, you can upload in a couple different ways. You can choose to cut and paste your information and hope that you have all of your columns set up correctly, or you can import from an Excel spreadsheet. We are going to go with the latter because it puts up less of a fight!
Log into your account, synch the account to make sure the editor and the User Interface are on the same page and click the “Import” icon in the Home Tab in the Data box.
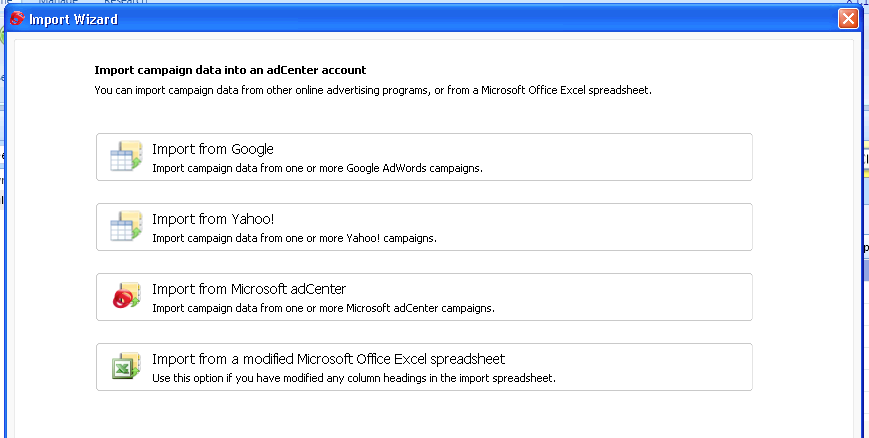
Once you have the Import Wizard screen open, you will pick the last option, “Import from a modified Microsoft Office Excel spreadsheet.”
One thing to note when using this function, is that you must uploaded your data from a single tab excel workbook and save it to the desktop. If you have multiple tabs in your document, the editor will become confused and not know what information to pick… (Ladies, does this sound like any ex-boyfriends you know!? Just playing guys!) So, keep it simple – one tab!
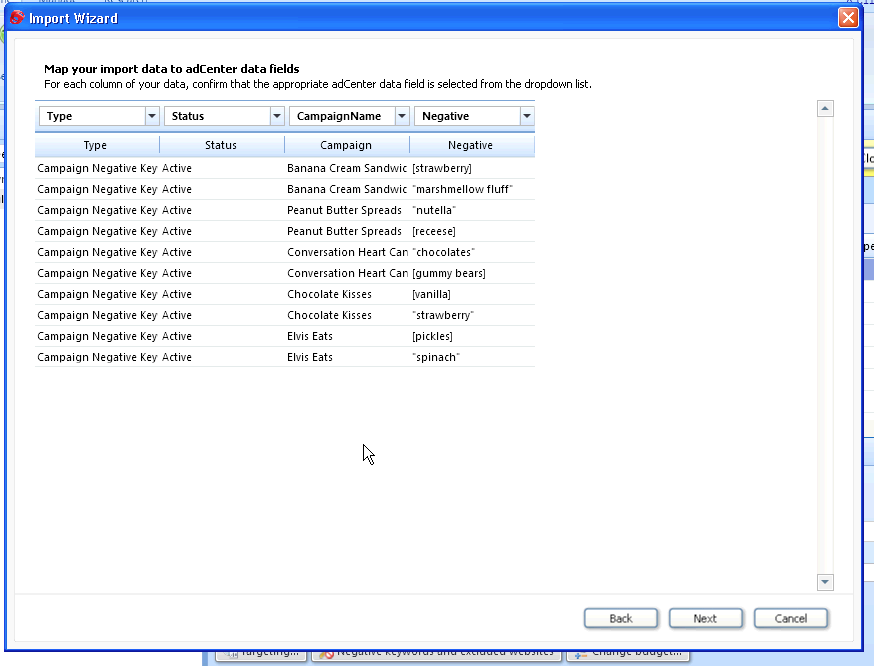
The editor will ask for a file name and then it will actually give you the option to view your import (al la Google!). This is the best feature of the Import Wizard, which is why I prefer using it instead of the cut and paste method.
Once you hit “Next”, you are on your way to upload! The rest of the process is the same as uploading your keywords or your bid changes. Don’t forget to synch your account back up with the User Interface when you are done with all of your edits!
This uploading technique is quick and simple and should save you a whole heck of a lot of heartache with adCenter. See, you don’t have to break up and throw all of your campaigns out on the street after all. Just by giving your account tools a little love, you too can have a strong, healthy relationship with adCenter.
Please let us know what tools make your life as a PPC Manager a little bit easier! Be sure to check out Sarah’s post tomorrow about the love between AdWords and Analytics reporting. Thanks, as always, for reading PPC Hero!


