Ever since enhanced campaigns have come into play, bid adjustments have become the heart of any optimization strategies, and discovering the particular day and time that your target audience converts the most will enable you to increase your accounts’ performance exponentially.
There are two options for generating conversion reports that will show you each day’s performance and what time of day your target audience converted the most. In this article, we will go through how to generate both reports and discuss the different strategies for adjusting your bids according to your conversion data.
The two different reporting platforms that are used to obtain this data are Google Analytics and Google Adwords. Even though there are many similarities between these different reports, understanding the difference is the key to knowing which report is right for you.
The Adwords Report
The most important thing to remember before creating either of these reports is to include enough data for your report to be statistically significant. Once enough data is collected and analysed, you can then use this data for creating a custom bid schedule that can be used to maximize your presence during those peak periods.
Now, if you only have a few different conversions and those are “View of a Key Page” conversions, then the Adwords report will be sufficient for creating a custom bid schedule. However, if you’re working an ecommerce business with many different types of conversions, then the Analytics report would be the most detailed report you could create.
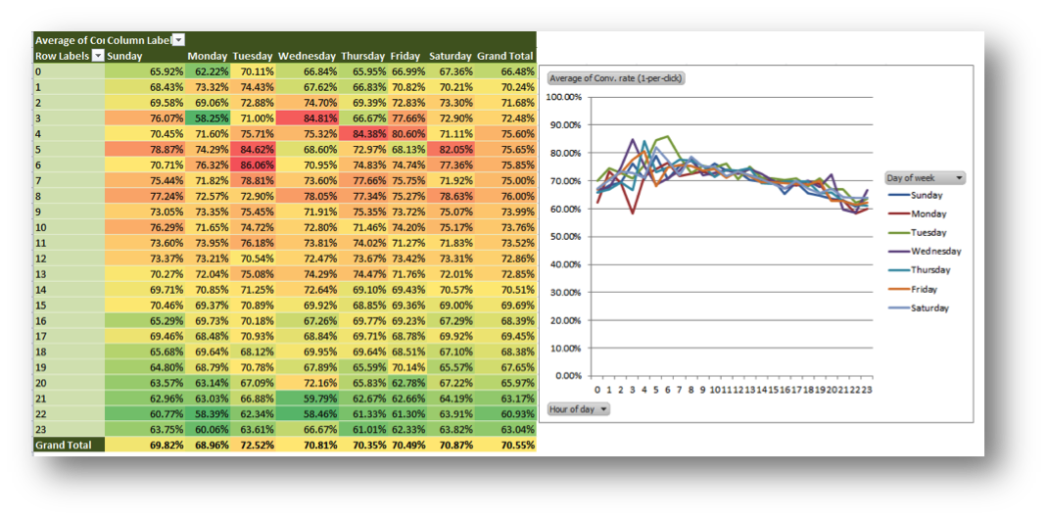
The first report that we will show you how to generate is through Adwords. The Adwords report is relatively straightforward and will enable you to divide your conversion rate by each separate campaign.
Here are the steps for creating the Adwords report:
- Click the “Dimensions” Tab.
- Select “Day of the Week” in the “View” scroll down menu.
- Make sure your selected date range has enough relevant data.
- Make sure to include “Conv.” and/or “Conv. Rate” in your columns. This will depend on the statistics that you wish to report on.
- Then download the report to Excel.
- Select the data (without the “Totals”) & create a Pivot Table.
- Insert the “Hour of Day” in the Axis field, the “Day of the Week” in the Legend field, and your “Conv.” Or “Conv. Rate” in the Values field.
- Once properly set you will need to select the “Grand Total” column and change the “Value Field Settings” to “Average”.
- The last step is to create a Pivot Chart with this data to clearly illustrate the data variations.
The main difference between both of these reports is how far you can drilldown on your conversion data. The Adwords report does have its limitations, especially when dealing with an account that has multiple conversions spread across multiple campaigns. Unfortunately, with the Adwords report you cannot segment by each of the different conversions.
The Analytics Report
The Analytics report is where you will be able to truly drilldown on your conversion data. With this report you will be able to segment all of your conversion data separately or all together for a more global view.
The difference between both reports may seem minor. However, it is quite the contrary. The Analytics report can segment your conversion data in any way you please. This report, due to its detail will even enable you to identify new KPI’s which could only be identified through this analytics report.
Even though creating this report is relatively easy, we will go through the steps to truly understand the potential value of each separately generated report by conversion.
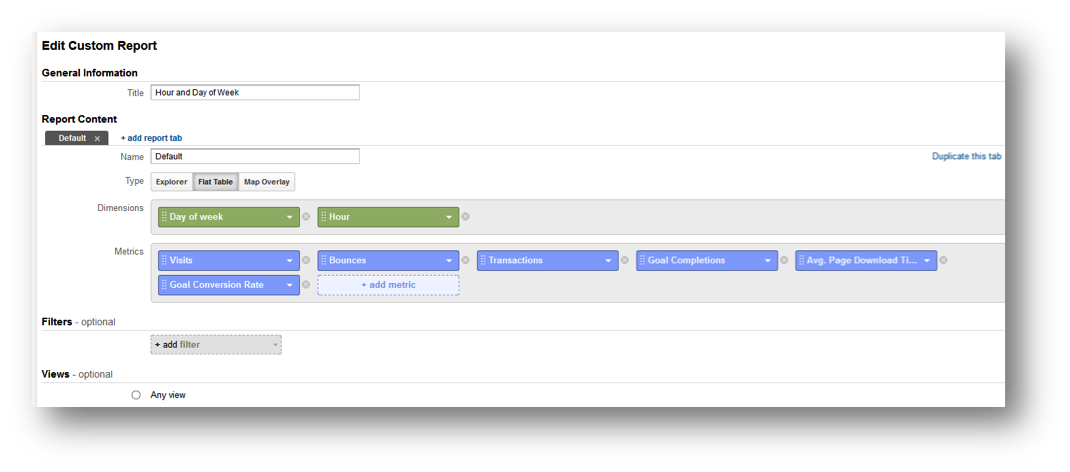
Here are the steps for creating the Analytics report:
- Click on the “Customization” header at the top menu in Analytics.
- Click on “+ New Custom Report”
- Name your report, and then add “Day of the Week” and “Hour” to the “Dimensions” section.
- Make sure that the “Type” of report is set to “Flat Table”.
- Include all the parameters you wish to track in the “Metrics” section (i.e. “Conv.” or “Conv. Rate”)
- Download the report to Excel.
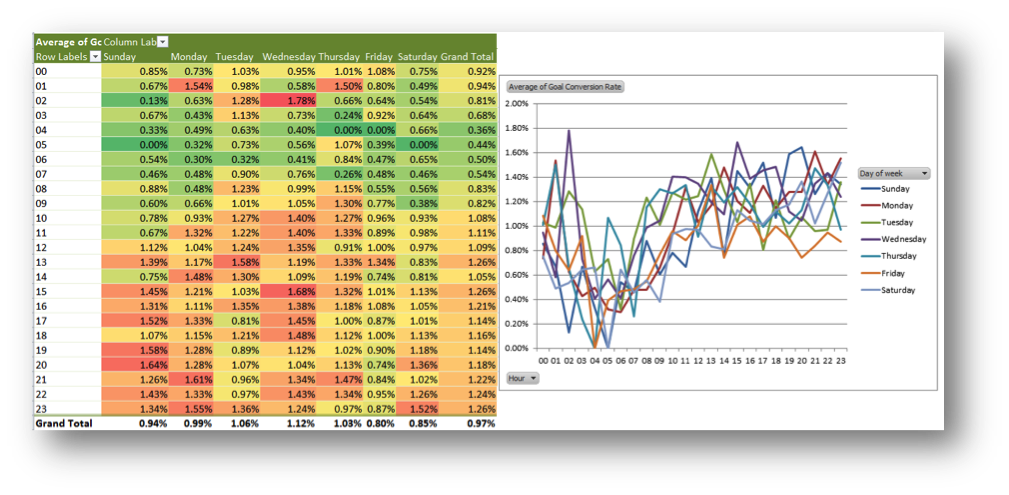
- Like the Adwords report, you will select the data (without the “Totals”) and create a Pivot Table.
- Insert the “Hour of Day” in the Axis field, the “Day of the Week” in the Legend field, and your “Conv.” or “Conv. Rate” in the Values field.
- Once properly set you will need to select the “Grand Total” column and change the “Value Field Settings” to “Average”.
- The last step is to create a Pivot Chart with this data to clearly illustrate the variations.
This is where the analytics segmentation really comes into play. Rather than having a general conversion rate chart for all conversions, you will be able to analyze each specific conversion by itself and adjust your bid schedule accordingly. This report can also be applied to many other metrics as well, such as ROI, revenue per visit, bounce rates and more.
Both of these reports will enable you to know what time is best to either increase or decrease your bids. However, the Analytics report will be more detailed per conversion and therefore will paint a better picture of your conversion data.
The Bid Adjustment Schedule
Creating your new custom bidding schedule is the easiest step in this entire process. For those who have yet to create their first custom bidding schedule, simply follow the steps below:
- Click on the “Settings” tab in Adwords.
- Click on the “Ad Schedule” button directly below the “Settings” tab.
- Click on “+Ad Schedule” button & choose your best performing days and time.
- Select all of the new scheduled times and click on “Set Bid Adjustment”
- Use this formula to calculate the % change: (Target CPA/Actual CPA -1)100
- Enter the % of change that you have calculated and voilà you now have increased your account’s profitability exponentially!
It is important to note that this optimization strategy can also be applied to underperforming time frames as well. Reducing your bids during low converting time frames will also help in creating a very cost efficient Adwords account.
In Conclusion, optimizing your bids is one of the most effective ways to improve your Adwords account performance. Hopefully, this article will enable you to improve your ROI without affecting your overall exposure. If you have already dabbled with bid optimization, then let us know your thoughts about this article and your own bidding strategies and techniques.
————
About The Author – Matthew Gangnier
With over four years of PPC experience and 8 years of traditional marketing experience, Matthew joined iProspect Canada as a PPC Analyst in June. Matthew is also an avid golfer and loves the great outdoors.


