After realizing how popular a topic Excel turned out to be on PPC Hero, I’ve decided to expand my top 5 Excel tips for PPC managers for our week-long series on Excel! Excel is an invaluable tool for PPC management, and everyone ends up developing a personal style and tricks. If you haven’t read the original post, here are my top 5 tips for PPC managers. It included concatenate, vlookup, conditional formatting, character case changes, and find/replace. So without further ado – the next 5 top tips for PPC managers!
6.) LEN is a great way to create your ad text correctly the first time. As you know, you’re only allowed 25 characters for your headline and 35 for each description line and the display URL. This is a pretty basic solution for PPC managers, but it’s a major time saver if you’re not already utilizing this when creating lots of new ads. When you’re done you can just sort out any that go over your character limit and edit them accordingly.
7.) We’ve had lots of feedback from the first post regarding pivot tables, so for the tutorial part of this post, I’ll take you through creating one. Admittedly, I don’t use them as much as I should, but they do help you to find information on virtually any piece of your PPC account to see how it’s performing relative to others.
For this short example, I’m going to take an ad report from one of our clients (the ads have been changed for privacy) and show you one example of how you could use a Pivot Table to understand how an ad test is going across all of the Ad Groups in one of your Campaigns. You could do this for ads across several campaigns as well, or you can decide to use other areas of your PPC campaign.
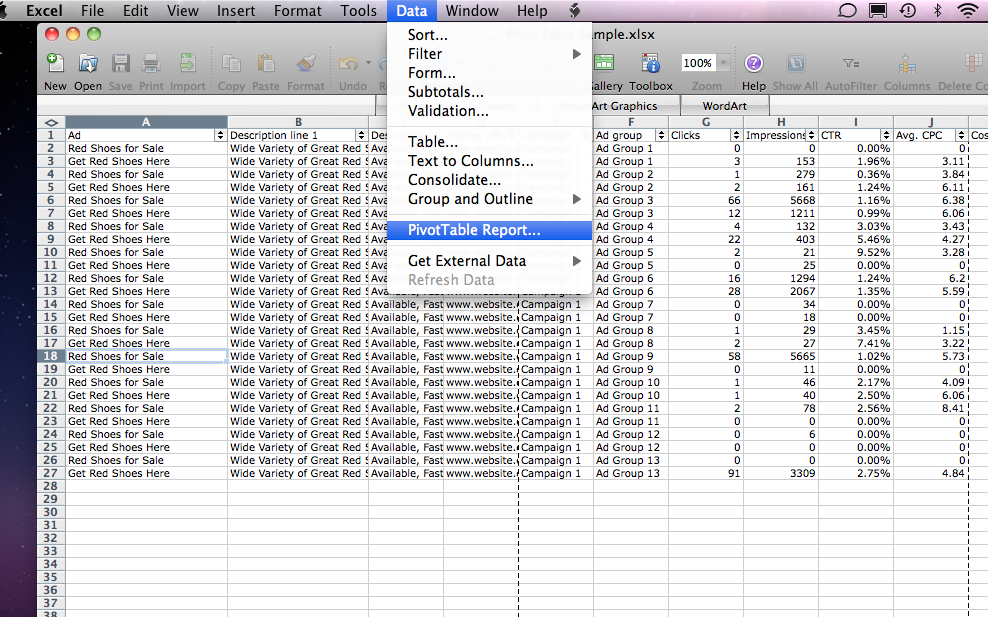
First, note that the way you setup Pivot Tables will vary across different forms of Excel. I am using Excel 2008 for Mac. First, I highlighted my data and went to ‘Data’ in the Menu bar > Pivot Table
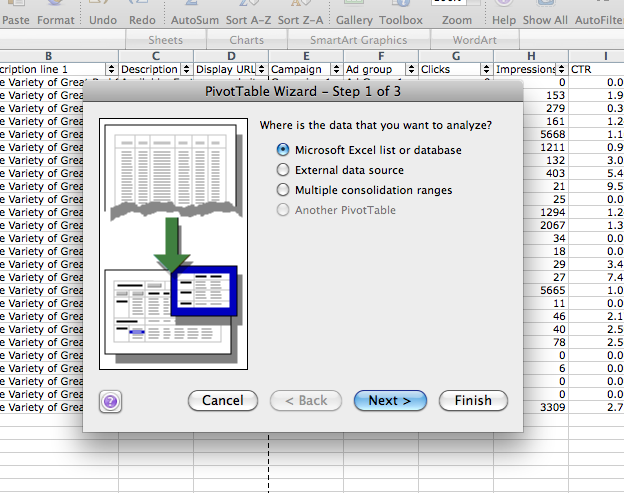
For my example, I chose the option “Microsoft Excel List or Database” to select data from the workbook that I have open.
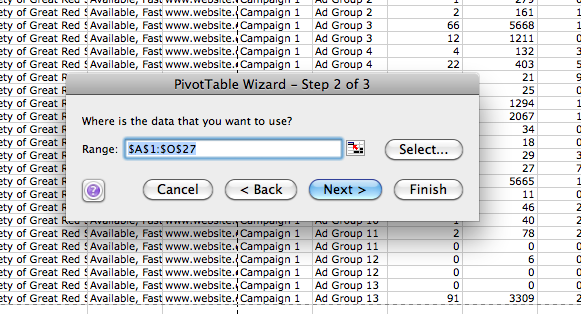
Then, select the cells you want included in the Pivot Table.
Lastly, choose if this Pivot Table should be in your existing sheet or a new one.
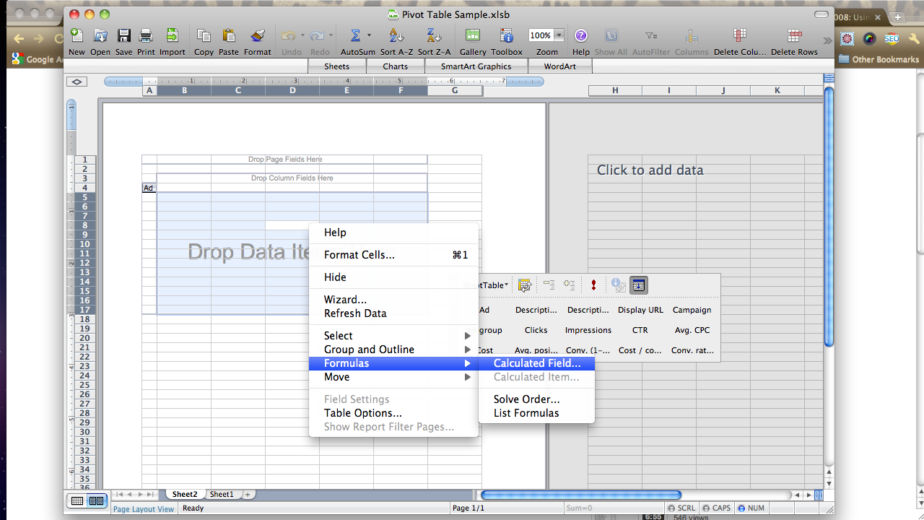
I end up with a table like the one in the picture below. From here, you choose which piece of data you selected you want to add to the table. I chose to ad the ‘Ad’ data, so that I can analyze my total conversions and CTR from all of the ads. (Note: I only have two ad copy headlines here, so they don’t immediately show up in the table).
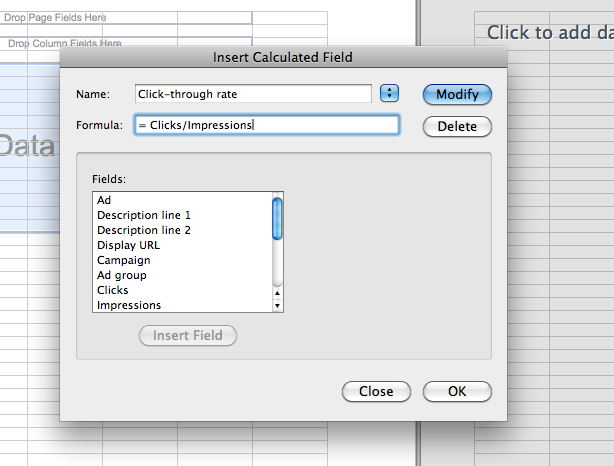
Next, I want to calculate my overall CTR for each of these headline variations. To do this, you should right click the table, and go to Formulas > Calculated Field.
In the box that pops up, you can name your calculated field, and select which factors should be included. Here, I am using the impressions and clicks to come up with my overall click-through rate for both ad variations. Your new calculated fields will show up in the next column, then you just need to right click the column and format the numbers correctly (I’m using percentage with two decimal places). Now you have your total click-through rate for all ads as well as the CTR for each variation.
From here, you can also choose to drag in conversion numbers or any other data that is relevant to what you’re doing.
8.) Charts with a secondary axis are especially useful for client reporting where you need to demonstrate one metric against another. This is helpful to give a visual representation of what’s going on, and to help explain reasoning behind sudden metric growth (or decreases).
Go to make a chart in the Gallery like you normally would (I’m using a line graph). Select your data points (I’ve highlighted impressions and clicks to be graphed on the same graph).
Right click on the line of one of the data points and select Format Data Series, there should be a menu of options that pop up with the new box. Select ‘Axis’ and choose to plot the selected series you clicked on the secondary axis.
Voila! Now from here, you can format your chart as you want it to appear
9.) Keyboard shortcuts are vital for using Excel efficiently. Watching someone who doesn’t use Excel frequently can be painful because you immediately want to show them all of the tips and tricks that you have for moving faster. Here are some of my favorites, which are by no means all of the great ones out there (these can vary according to what edition of Excel you use or if you’re a Mac or PC).
First, if you’ve never customized your Excel layout – do it now! Oftentimes I need to delete out irrelevant information that I didn’t filter during the download process. The first thing that someone helped me with when I started at Hanapin Marketing, was adding in tools they use frequently right in my toolbar. I use add columns/rows, delete columns/rows, Autosum, Show all, and Autofilter every single day. I’ve also opted in a Pivot Table button so I don’t have to go into the menu and find it every single time.
Some other helpful tips:
CTRL+c (Command+c for Mac) – Copy
CTRL+v – Paste
CTRL+Shift+ Down/Up – Selects all of the data from the cell you’re on to the bottom of data series
CTRL+Shift+Left/Right – Selects all data to the left or right of your cell (Can be used in conjunction with CTRL+Shift+Down/Up
Delete column or row – CTRL+k (Command+k on a Mac will let you add a hyperlink)
Bonus tip: If you’ve never used Freeze Panes (available in the Window drop down menu) you can use it to keep track of which column you’re working on if you’re in row 1007 of an Excel spreadsheet (or further down)! You just select the cell that you want it to freeze at, keeping in mind that it will also freeze anything to the left of your selection, and scroll down to keep your headers constantly in view.
10.) IF Function
I’m straight up jacking this from some of our reader’s suggestions as it really does have some great, practical applications for PPC and is among one of the most useful functions available in Excel. According to Excel’s help, the IF function tests to see if a certain condition is true. If it is true, the function enters one result into a specific cell, and if it is not, it enters a different result to the cell. We use this function a lot when we build URL builders for our clients that have different areas we need to track.
You can choose to use an IF function in order to make bid changes on keywords that meet a certain criteria. While this is an advanced function for Excel, it’s also important to make sure you’re pulling enough data to make an intelligent decision. I prefer to make bid changes using Advanced Search and Advanced Bid Changes in the AdWords Editor for simplicity, or even by sorting the data on my own in Excel, but this is definitely a time saver for Excel.
I hope you enjoyed our expanded list of Excel tips! This list is by no means a comprehensive one and there’s always more to learn. What tips do you have? Share them in the comments below. Thanks for reading!


