As part of our week-long series on PPC geo-targeting, today I’m going to showcase the basics of setting up geo-targeting in the “big three” pay-per-click search engines. While the general process for setting up geo-targeting is similar between Google AdWords, Yahoo! Search Marketing and Microsoft adCenter – they do have very unique steps and feature sets. Read on for an introduction to setting up geo-targeting!
GOOGLE ADWORDS
In AdWords, your geo-targeting settings are found at the campaign level. When working with a campaign in the new interface, just click on the “Settings” tab and then click “Edit” under Audience > Location. In the old interface, find Targeting > Locations and click on the “Edit” link. Regardless of which interface you are using, the geo-targeting tool is the same! Here’s a break-down of your setup options:
Search – Use this feature to search Google’s geo-targeting database / map for locations you would like to target.

Browse – Use this feature to browse through all of the available Country, State, City locations.

Bundles – Use this feature to choose pre-set bundles. These typically encompass common country groups (i.e. US & Canada) or continents.

Custom > Map Points – If you’re a closet-cartographer, this may be your weapon of choice. Use Map Points to enter longitude and latitude or zip codes to narrow in on very specific locations.

Custom > Custom Shape – Use this feature if none of the other features cater to your geo-targeting needs. Literally play etch-a-sketch on the map to pinpoint your locations!

Custom > Bulk – Use this feature to type in a large quantity of locations all at once.

YAHOO! SEARCH MARKETING
The first point to make is that Yahoo!’s geo-targeting only includes the US and Canada. If you need to target other countries, you’ll have to open accounts for those countries specifically. But within the scope of the US and Canada, in YSM, geo-targeting can actually be set at either the campaign or ad group level. The default is campaign level, so if you need to tweak your settings for ad groups, you have to physically make that switch. Yahoo! also allows you to view your geo-targeting options at a glance from the dashboard, which is a nice feature (especially for those of us who are forgetful). But to get started, you’ll need to enter your campaign, and then select “Campaign Settings.” From this menu, you can choose to edit geo-targeting for the entire campaign or ad groups, and also edit the specifics by finding the “Geo-Targeting” box and clicking “Edit.” Here’s a break-down of your setup options:
Dashboard Campaign Targeting – This is the gentle reminder I was talking about that you can view from your dashboard.

Campaign Settings – This is where you choose between campaign or ad group targeting and set geo-targeting for that campaign.

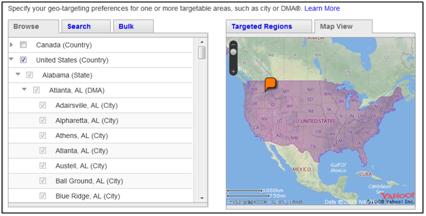
Browse – Use this feature to review Yahoo!’s options for states, cities and DMAs. Designated Market Areas, as created by Nielson Media Research, are commonly grouped locations that are targeted by many forms of media and advertising. You also have the option to view an interactive map while you make your decisions.


Search – Use this feature to search Yahoo!’s database by zip codes, or location names.

Bulk – Use this feature to manually enter locations by name or zip code all at once.

MICROSOFT ADCENTER
I’m not going to lie and say that geo-targeting in adCenter is easy. It’s a somewhat awkward process that honestly doesn’t offer as much flexibility as either Google or Yahoo!. You can still narrow down your targeting options, but there are a few oddities you need to be aware of. Firstly, all geo-targeting options are managed at the ad group level. Secondly, MSN’s Language and Market settings can trip you up if you’re not careful. Late last year I wrote a post about how you can maximize international exposure with adCenter by leveraging the combinations of language and location targeting. This is important to remember, because if you are trying to reach an international audience, these limitations could restrict you from reaching potential customers. Thirdly, Language and Market settings can only be changed at the time of ad group creation. Detailed geo-targeting within the scope of those settings can be changed at anytime, but you’re locked into Language and Market for good! To get started, you’ll need to create a campaign. But before you get to geo-targeting settings, you’ll have to create an ad group, too! Here’s a brief break-down of MSN’s geo-targeting features:
Language and Market – This is the feature I referred to for maximizing international exposure. These are the default location and language settings for the MSN/Live search engines – your choice will dictate which segment of searchers your ads reach.

Target Customers by Location – Use this feature to slice and dice geo-targeting options within your Language and Market settings. You can break down the preset countries into states, metro areas and individual cities.

Well, that pretty much sums up the basics of setting up geo-targeting with Google AdWords, Yahoo! Search Marketing and Microsoft adCenter. Check back in all week for additional tips, tricks and tactics for maximizing your geo-targeting success!


