Have you faced a tight deadline and needed to create hundreds or thousands of new display URLs? Maybe you’ve onboarded a new account and realized that you have 10,000 ads all with the same display URL and no mobile preferred ad copy.
Then this is the article for you.
In the next few minutes, you too will be able to impress your friends, family, and maybe even your boss with your new found ability.
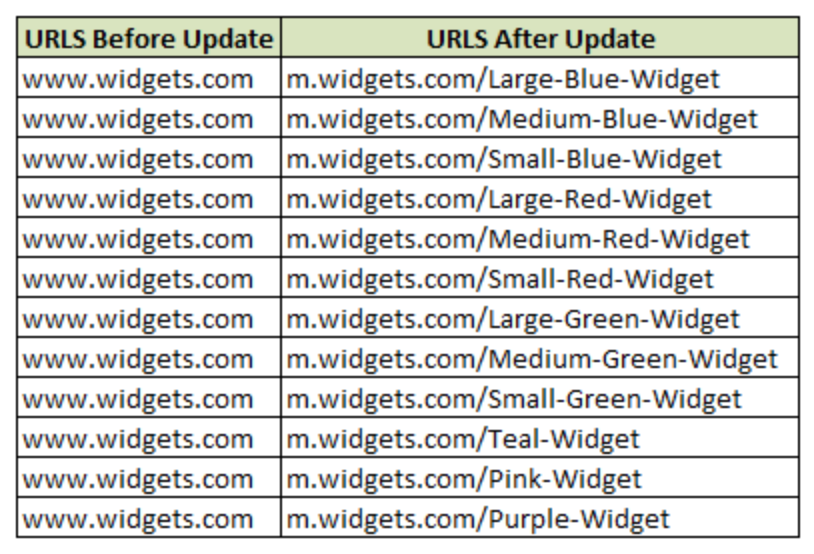
Before delving into the five phases that are needed to create display URLs in bulk, let’s take a look at the before and after so you can get an idea of what you can expect. In true PPC fashion, the items that are on sale in our example today are of course wiaddgets, of all sizes and colors. We’ll also be adding ‘m.’ to the URLs as in this example we’re creating mobile preferred ad copy.
Here’s a link to the Google Docs sheet where you’ll find each phase on its own worksheet. I recommend opening that up and then following along with the article, especially if you’re dual screening. Even flicking through how each phase looks first will give you a better understanding as you start to read the details.

Note to Reader – As you embark on the steps below you will see the word ‘column’ a lot since we’re talking about Excel. In fact, it makes up about 3 percent of the total words in this article. If you have a synonym other than ‘upright pillar’ or ‘military convoy’ please let me know in the comments below.
Phase One – Making Space
- Start with an ad copy bulk sheet with the columns:
- Headline, Description Line 1, Description Line 2, Display URL, Destination URL
- Insert a duplicate Headline column, call this one Headline-2
- Then insert blank columns to the right of the Headline-2 column. Three or four should be enough. You should have a blank column for each additional word of your headline. For example, in our scenario there are three words in the headline so we need two blank columns.
- Next, right click and highlight the Headline-2 column

Phase Two – Text to Columns
- Now to break up the words in the Headline-2 into their own individual cells
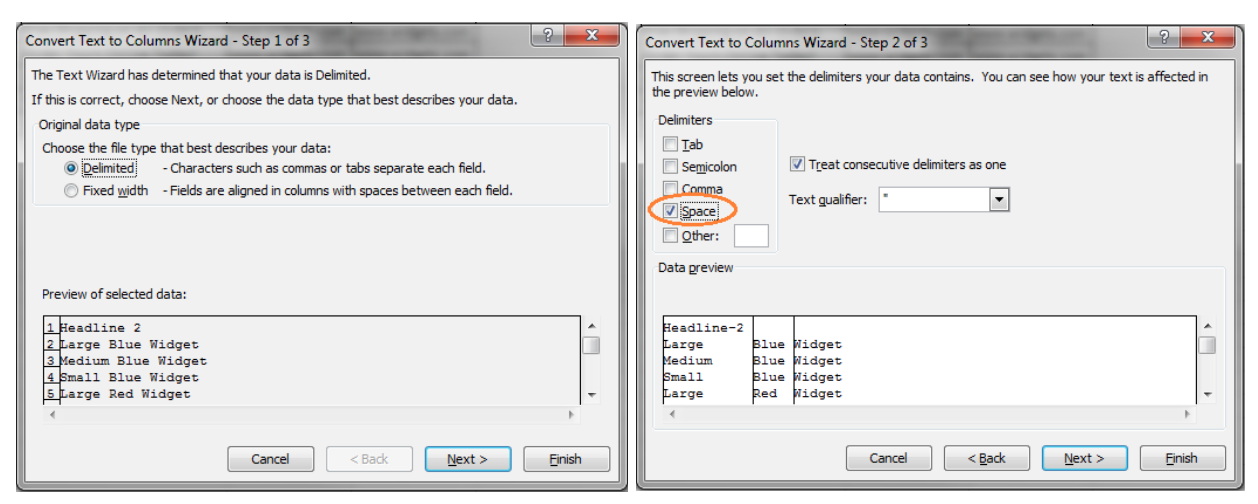
- While the Headline-2 column is highlighted, Click the Data Ribbon, then Click “Text to Columns”
- Select Delimited, then Next
- Select “Space,” then Next (as you have a hyphen in Headline-2, this cell won’t be affected)
- Click Finish

Phase Three – Adding Separators
- Your sheet will look like the below (you can delete any extra columns you added that are blank all the way down)

- Next, add new columns containing a ‘-’ between columns B & C and C & D. These can be labeled simply with a dash ‘-’
- The amount of words that are in your longest headline will determine how many ‘-’ columns you need. i.e. two extra columns for three words etc.

Phase Four – Combining Columns
- Now it’s time to add the new URL root to a new column, here we’re using “m.widgets.com/” in Column I below
- In Column J, combine the new Destination URL (Column I) with each word and each separator
- Your formula will look like the following =I2&B2&C2&D2&E2&F2
- Fill Column I all the way down with new URL, (“m.widgets.com”)
- Drag formula in Column J down to fill all cells in column
- The custom URL is taking shape

Phase Five – Getting Rid of Excess
If you have headlines that vary in word count (which is highly likely) you’ll need to do a bit of a clean up. For example, cells J11, J12 and J13 all end with a ‘-’ which is not what we want.
- Add a Filter (Ctrl +Shift+ L) to Row 1
- Filter Column J for “ends with ‘-’
- Use the following formula to remove the last character:
- =LEFT(I11,LEN(I11)-1)

- Drag down the formula and that’s it!
- Now all you have to do is transfer these newly trimmed URLs and delete all the columns you no longer need
- Note: You’ll need to do some QA for any weird looking URLs or ones that are too long
To Conclude
There you have it. In a matter of minutes, you can have thousands upon thousands of relevant Display URLs.
One caveat is that these new URLs are completely dependent on how varied and relevant your headlines are. If all of your headlines are the same you can adopt the same principles above with the description lines, however, this is a lot more cumbersome and requires more editing and cleaning up.
You just may find that with this change you’ve improved your CTR, your Quality Score, and are providing ads which are more informative and eye-catching for searchers quickly glancing through the SERP.
About The Author – John Byne
John Byrne, who originally hails from Dublin, has been at iProspect Toronto since 2013. He works on Paid Search and Paid Social for “a well-known auto brand.” You may recognize him from his breakout role as “King’s Bodyguard #6” in Season 3 of The Tudors. Connect with him on Linkedin.


