Google Analytics is an extremely valuable tool in analyzing the performance of your website, whether you are focusing on paid or organic traffic. The first time you log in to Analytics though can be quite overwhelming. I was just getting comfortable with creating custom reports in the old version of analytics when Google released the updated version in April. I finally worked up the nerve to switch over and discovered some great new features that were added to the custom reports.
I’m going to cover some custom report basics and then walk through a step-by-step process to creating your own custom report in the new version of Google Analytics.
Custom Report Basics
Before we jump into the step-by-step process of building custom reports, I want to go over the two basic components of Google Analytics reports:
Metrics – A metric is a qualitative measure of how visitors interact with your site. They represent the columns in your report. You can select from five different groups of metrics: Site Usage, Content, Goals, E-Commerce, and Advertising.
Dimensions – A dimension is a characteristic of a visitor or a page on your site that you can use to organize your metrics. They represent the rows in your report. You can include up to five dimensions in each report, one as the main dimension you want to measure and four sub dimensions to further drill down.
In the sample traffic source report below you are looking at the metrics Visits, Pages/Visit, Avg. Time on Site, % New Visits, and Bounce Rate for the dimension Source/Medium. Each different Source/Medium value is an individual row in the report.
It is best to have an outline of what you want included in your report before you start building. However, there are restrictions that come into play when combining metrics and dimensions. Google’s help page provides an outline of valid dimension-metric combinations. Once you have an outline of the data you want to show in your report it is time to start building your customized report
Building Your Report
I want to analyze the performance of keywords on the different landing pages of my website. That means I need to include two dimensions in my report, keyword and landing page, along with the metrics conversions, conversion rate, and bounce rate. The next 7 steps will walk you through how to set up this report.
Step 1: Create a New Custom Report
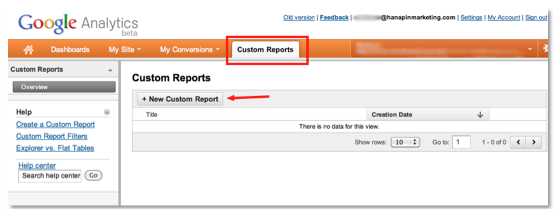
The custom reports have been moved to their own a tab along the top of the page. Click on the custom reports tab. You are taken to the overview page where all your reports will be stored. To create a new report, click on the “+ New Custom Report” button.
Step 2: Name the Report
The first thing you’ll want to do when you get to the Create Custom Report Page is to name your report. Give your report a simple yet easily identifiable title. Different people may be creating reports in the same account and you want to be able to identify your report from the list of saved reports. I’m naming my report “Keyword Performance by Page”.
Step 3: Set Your Filters
A new feature in the updated version of Google Analytics is the custom report filter. In the old version any report you created applied to all the data in your account. When you click on the drop down arrow on the filter box, a list opens up of all the dimensions. Now, you can tell Analytics which data you want to include.
I only want to view PPC data for Google in this report so I am going to set the following filters:
Step 4: Select Your Report Type
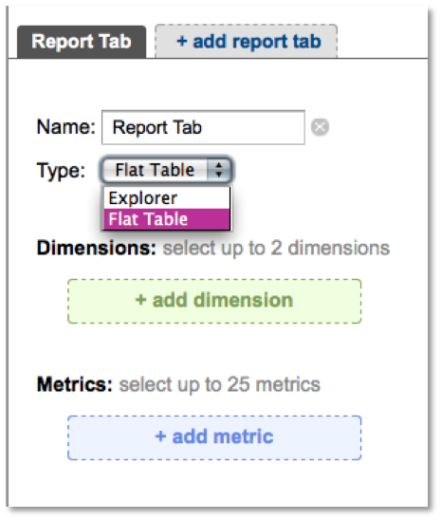
There are two report types you can choose from when creating a custom report, Explorer and Flat Table. The Explorer report type is similar to the report layout in the old version of Analytics. You select your metrics, and then drill down into the metrics based on the dimensions you choose.
The flat table report allows you to analyze two dimensions side-by-side. You can also select up to 25 different metrics to include in the report. The difference is you don’t have to drill down into one dimension to see the other. For example, if you wanted to compare the performance of a keyword by source you would need to click on the keyword to view the source performance. With the flat table report you can view the performance data for each keyword in each source all on one page.
Since I am just looking at two dimensions, keyword and landing page, I am going to select the flat table report.
Step 5: Select Your Dimensions
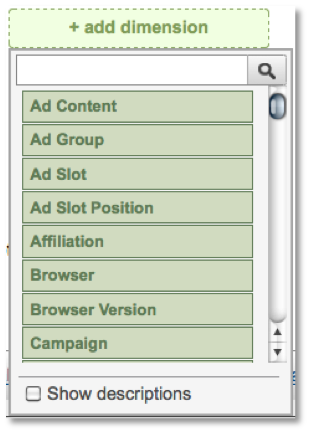
To select your dimensions all you do is click on the “+add dimension” box.
A drop down box will open and you can either scroll through the list of dimensions or type the one you want in the search box.
Step 4: Select Your Metrics
You can include up to 25 metrics in the flat table report. Google Analytics automatically removes the invalid metric pairs based on the selected dimensions from the drop down list. This way you don’t have to continually refer back to the valid pairs chart on Google Help. For my report I want to look at conversions, conversion rate, and bounce rate.
Step 5: Set Report Visibility
If you have more than one account under the same log-in information, you have the option to make your report visible in those profiles as well. By default, the report you create will only show in the profile you are creating it in. To change this setting click on the 0 other profiles button and select the account you want to apply it to.
Step 6: Create Your Report
Once you are satisfied with your report click on “Save” at the bottom of the page. I now have a report showing my keyword conversions, conversion rate, and bounce rate for each landing page.
Step 7: Manage Your Report
Once you create your report it will be saved to the list on the overview page. From here you can go back and edit your report at any time. You can also share a link to your report if you are managing an account for a client or you can delete your report all together.
One thing to note when sharing a custom report is that the link will reflect the state of the report when you first created it. This means if you create a report and share it with a coworker, then go back in and edit the report a week later the link you shared will not include the edits.
These are the basic steps to creating a custom report in Google Analytics. There is so much more you can do with custom reports and the best way to learn is to get in there and start doing it. If you have any questions about building custom reports or want to share some of your favorite custom reports please comment below!


