Google Tag Manager makes tag placement simple. Many users utilize GTM for placing conversion tags but you can track many other page elements as well.
In this article, we’ll tackle a scenario in which we track click events on a webpage. Tracking click events is helpful for sites that don’t have separate confirmation pages. Events are also useful for tracking specific interactions on the site, such as buttons and widgets.
While the example in this article cover clicks, you may utilize the same methods for any page element. The same GTM usability features we covered in the previous article will all carry over to whatever you track.
Adding Additional Information for Triggers
Triggers are necessary for firing tags at the correct time. Many users start with page path triggers. These triggers fire tags on specific pages, such as order confirmation pages. Page paths handle the most basic tag implementations but only scratch the surface for trackability.
What if you want to track other elements on the page?
The easiest way is through listeners. These listeners monitor for specific actions or events on the page. If you want to appreciate this more fully, look up click event listeners and try manually doing this first.
If you happened to look that up and thought, “I hate this” or “isn’t there a simpler way?” you’ll be happy to know GTM will take care of the basics for us!
Although it’s not enabled by default, we can create listeners in GTM with the click of a button.
First, navigate to the variables menu.
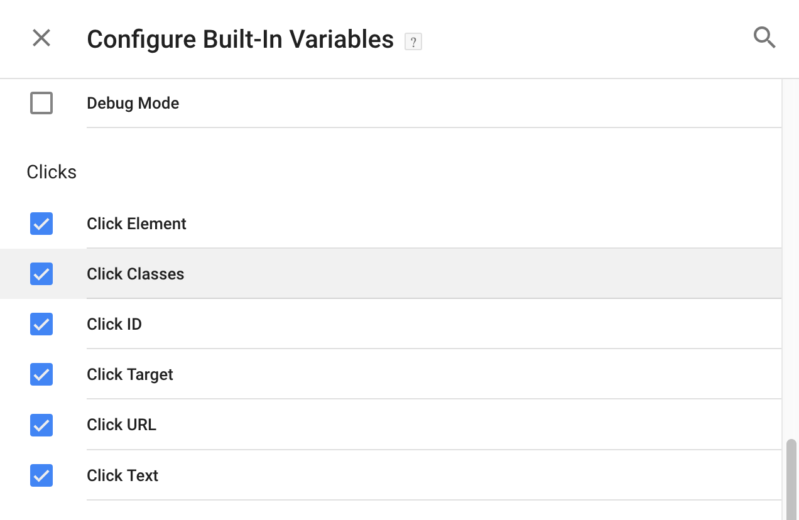
Now, click configure under built-in variables. A new menu will pop up and you can now enable whichever elements you need.
For clicks, you will most often use click ID and click class. If there is something else you’d like to use, go ahead and enable it as well.
If this sounds like gibberish to you, don’t worry. These pieces are all standard HTML and we’ll bring it all back together shortly.
Tagging A Click Event
There are only two more tasks to complete once we enable the proper variables. We need to create an event and then we need to create the actual trigger.
Events In GTM
GTM offers integrated solutions for Bing and Google Analytics event tags. This feature allows you to track specific actions across your site. The first step is picking your naming convention for the category, action, and any of the optional parameters.
Then go into the tag menu of GTM and select the GA event Tag or Bing Ads custom event. Fill in the parameters with your preferred values and you are good to go.
If you are interested in events, in general, see the documentation for Google and Bing.
If you are using another platform without an integrated solution you can always use the custom HTML tags to implement them. Many platforms will even offer specific directions on implementing their tags in GTM.
Creating The Trigger
Earlier in the article, we enabled the click variables, Now it is time to use them. So far, we know there are certain elements we can use as triggers but how do we find the actual values?
Let’s use an example from PPCHero.com. In this scenario, we want to track users who click the subscribe button and join the email list.
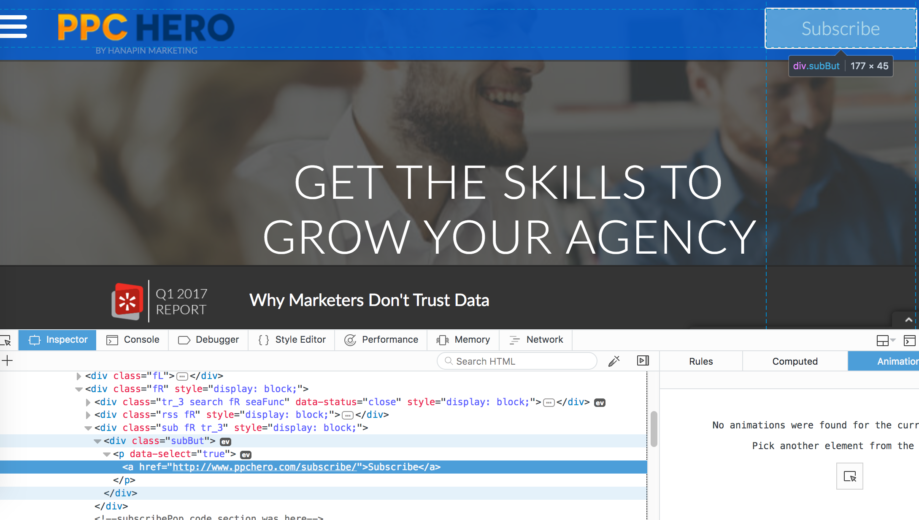
To find the necessary details, we can right click and inspect the element using the web developer tools. The actual look will vary depending on your browser but all offer the same information. If you are using Chrome, you should see something very similar to the screenshot below.
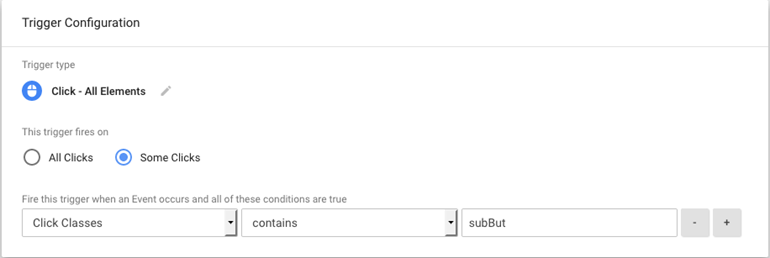
The HTML for the subscript button has the class listed as subBut. We can take that information back to GTM and create our trigger based on the class.
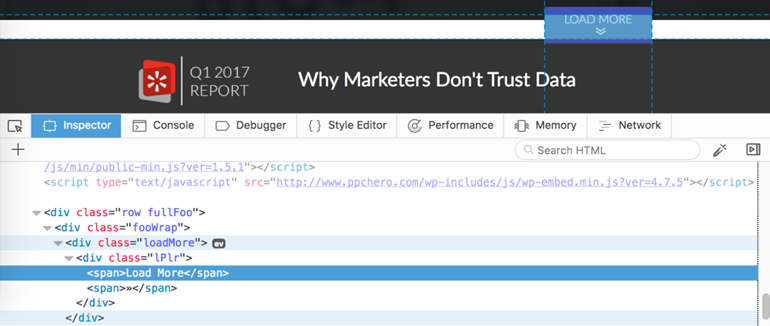
You can do this with almost any element in the page source. Below is what we’d look for if we were tracking users who clicked the load more button.
Once you have everything set up you can preview. If everything checks out, publish your tags and happy tracking!
Conclusion
We covered a basic example in this article. Page tracking and click tracking will take you far. You can even take the same concepts and apply them to form tracking as well as more advanced solutions.


